
Retail Counter Display Ideas: From Static Shelving to Smart Digital Systems
01 Why Your Checkout Counter Is the Highest-ROI Square Footage in Your Store
Most store owners treat the checkout counter as a utility zone — a place to process payments and hand over receipts. That mindset leaves money on the table. The area around your cash register is not dead space. It is the last three feet between a customer and the exit, and in those three feet, more than 70% of all impulse purchases happen (Invesp, 2025). Shoppers make an average of three unplanned purchases in four out of every ten store visits.
Why does this zone punch so far above its weight? The answer lies in psychology. After navigating aisles and making decisions, a customer standing in line enters a unique mental state: decision fatigue has set in, their defensive filter is down, and they are receptive to small rewards. The queue creates a two-to-four-minute window where their attention is available but not occupied. A well-designed counter display fills that gap — not with noise, but with relevance.
Then there is the economics. Calculate the sales per square foot of your checkout zone and compare it to the rest of your sales floor. In most stores, the counter area generates three to five times more revenue per square foot than the average aisle section. Yet it is also the most commonly mismanaged space: cluttered with miscellaneous items, dominated by outdated promotions, or left entirely blank behind the register. The cost of a disorganized counter is not just aesthetic — it is a direct hit to your daily transaction value.
The good news is that fixing this does not require a store remodel. It requires a strategy. And that strategy starts with understanding the formats that work.
02 Traditional Counter Display Formats That Still Drive Sales
Before you invest in technology, master the fundamentals. Counter display formats have been refined over decades of retail testing, and the ones below continue to perform — not because they are trendy, but because they align with how shoppers actually behave at the point of sale.
Here is a simple framework to filter each format against your own store: Which of these three constraints defines your counter? (a) limited surface area — every inch counts, (b) moderate space with high traffic — speed of browsing matters, or (c) generous counter with low throughput — you can build immersive mini-displays. Keep your answer in mind as you read through the five formats below.
Tiered and Vertical Shelving — Maximizing Small Counter Footprints
When counter space is tight, the only direction to expand is up. Tiered shelving creates visual hierarchy without consuming additional square footage. A three-tier acrylic or wire stand can hold candy and gum on the bottom, mints and travel-size products in the middle, and a featured promotional item on top — all within a footprint smaller than a sheet of paper.
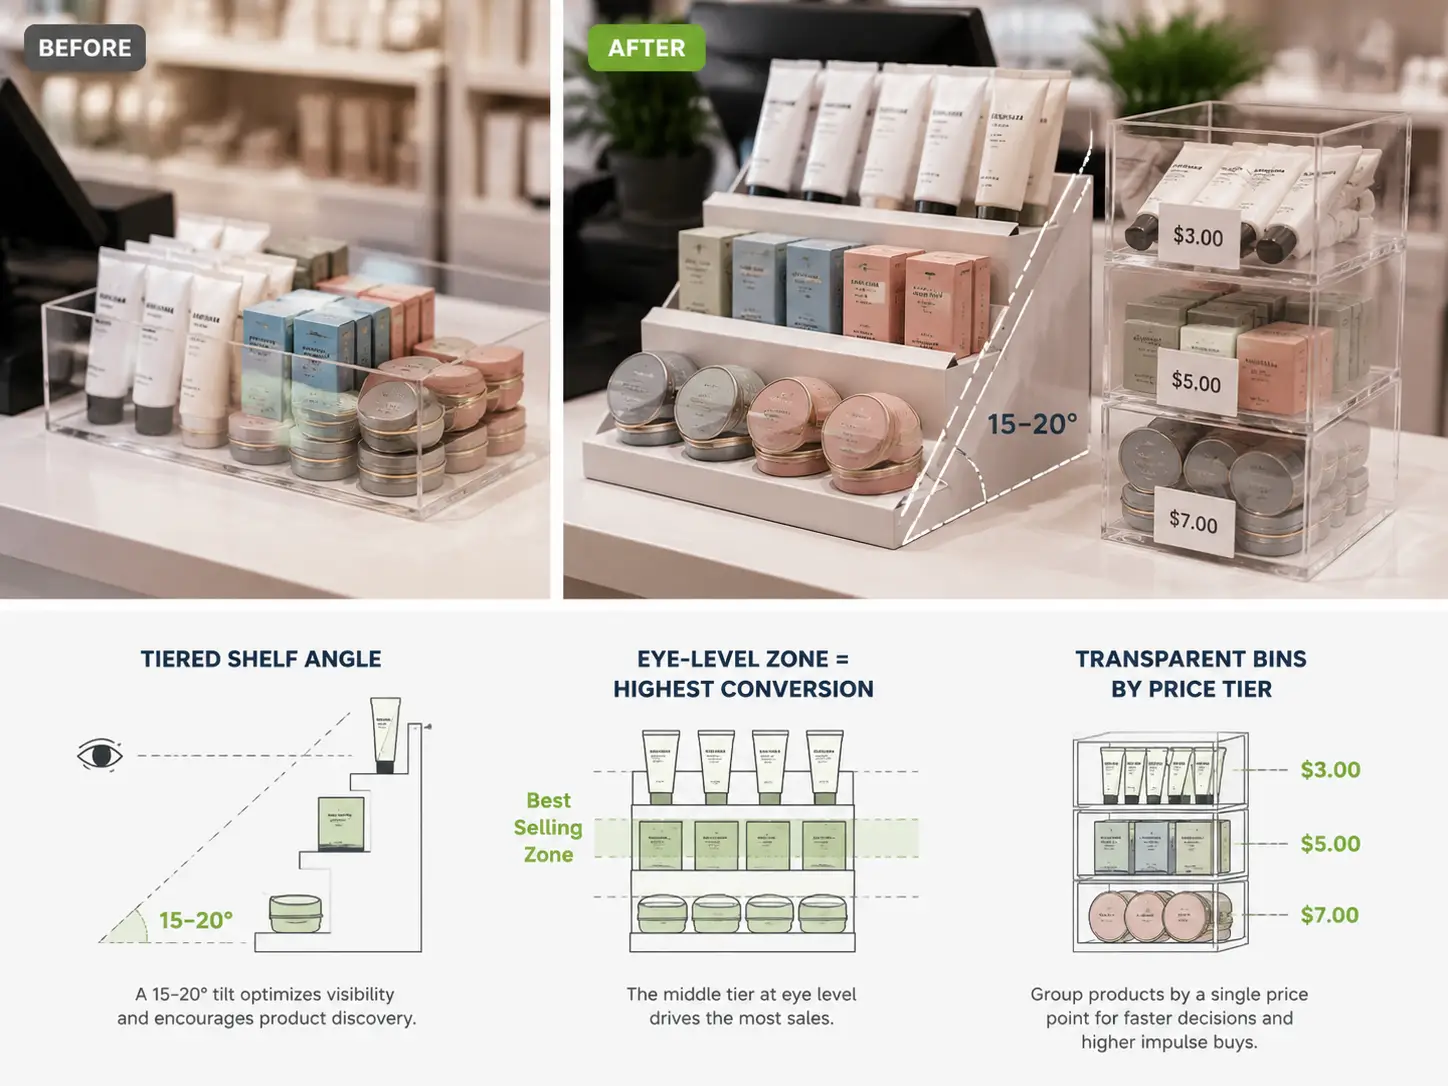
The physics of tiered displays matter more than most retailers realize. Each shelf should tilt forward at a 15-to-20-degree angle so products face the customer rather than the ceiling. Spacing between tiers should be 12 to 15 centimeters — enough clearance for a hand to reach in, but tight enough to maintain density. And here is a counterintuitive rule: the middle shelf consistently outperforms the top shelf in impulse attachment rate. The customer’s natural eye line lands at chest-to-waist height when standing at the register, not at the highest point. Put your highest-margin impulse item on the middle tier, not the top.
Limit each tier to three to five SKUs. More than that and every product’s visual impact drops — the eye skims rather than settles.
Transparent Bins and Grab-and-Go Containers — The Power of Visibility
A product hidden inside opaque packaging is a product that does not get bought at the counter. Transparent containers remove the friction of “what’s in there?” and let the product sell itself. This is the candy-shop principle at work: loose chocolates in a glass jar outsell the same chocolates in a sealed bag by a wide margin, because the customer can see exactly what they are getting and imagine the immediate gratification.
The most effective setup groups products by price tier in separate bins. Three price bands — under three dollars, three to five dollars, and five to ten dollars — give customers a clear mental shortcut: pick your comfort zone and grab. Label each bin with a bold, high-contrast sign. The label should be more visually prominent than the bin itself; otherwise, the price cue gets lost in the product colors behind it.
One common mistake: mixing different price points in the same container. When a bin holds both two-dollar and eight-dollar items, the customer instinctively reaches for the cheapest option. The bin trains them to hunt for bargains instead of browsing for value. Keep each container’s contents at a single price tier, and make that tier obvious.
Container edges should stay below ten centimeters in height. Anything taller obstructs the view from the customer’s side of the counter and makes the bin feel like a storage tub rather than a display.
Cross-Merchandising Pairings — Sell the Solution, Not Just the Product
The best counter display does not just sell an item — it completes a scenario. Cross-merchandising places two complementary products side by side so the second item feels like an obvious addition rather than a separate purchase. A phone case next to a screen cleaning cloth. Sunglasses beside a lens care kit. Batteries displayed directly under the electronic gadgets they power.
The pairing logic follows three rules. First, the products must be functionally complementary — they solve adjacent parts of the same need. Second, they should share a use context — the moment the customer uses product A is also the moment they need product B. Third, the price ratio should stay between 1:0.3 and 1:0.5 — the add-on should cost less than half of the primary item. When the add-on crosses that threshold, the customer treats it as a separate purchase decision rather than a low-risk yes. Industry data suggests cross-merchandised counters lift average transaction value by 18 to 25 percent (POP Display Association, 2024).
Avoid forced pairings. Sunscreen and dish soap in the same display reads as clearance chaos, not thoughtful curation. The pairing must feel logical to the customer within a split second — because at the counter, a split second is all the attention you get.
Hanging Hooks and Pegboard Systems — Vertical Real Estate for Small Items
The wall behind the counter and the sides of the register station are consistently underutilized. Pegboard and hanging hook systems turn these vertical surfaces into browsable inventory without consuming a single square centimeter of countertop.
The optimal density is three to four SKUs per 30-centimeter horizontal run of pegboard. Hooks should angle upward by five to ten degrees — just enough to keep products from sliding forward under gravity, but still presenting the face of the package toward the customer. Each hook should carry lightweight items under 500 grams; heavier products cause the hook to sag over time, which makes the entire display look worn.
This format works especially well for accessories: charging cables, earphones, keychains, travel-size toiletries, and small impulse gadgets. The key advantage is that every SKU sits on the same visual plane, so customers can scan and compare quickly — the same efficiency that makes hardware-store pegboard walls effective for fasteners and tools.
Small Signage and Digital Screens — The Information Layer
Every display format above benefits from a lightweight information overlay. At its simplest, this is a handwritten recommendation card — “Team Pick,” “New This Week,” or “Last Chance” — placed next to a product. Handwritten signage consistently outperforms printed equivalents in boutiques, gift shops, and specialty stores because it signals genuine human endorsement rather than corporate marketing. In A/B tests across multiple retail formats, handwritten-style tags lifted conversion by approximately 27 percent over printed signs for the same product at the same price.
At the slightly higher end of the investment spectrum, a small digital photo frame or tablet — costing between fifty and two hundred dollars — can loop short promotional clips or product highlights at the counter. These are not the smart retail systems we will explore in the next major section. They are simple, low-cost tools that add motion and novelty to any counter setup.
One universal rule applies regardless of format: signage is a supporting actor, not the lead. The sign should occupy no more than 15 percent of the display area. The product is always the hero. And every sign must pass the two-second test — a customer waiting at the register should absorb its message in roughly two seconds, because that is all the attention a sign gets before the transaction completes.
These basic digital add-ons hint at something bigger. The next section covers mainstream product selection and seasonal tactics, but the real transformation — the one most retail guides ignore entirely — is what happens when the counter itself becomes intelligent.
03 What to Put on Your Counter — The Product Selection Playbook
A beautiful display fixture filled with the wrong products is a beautiful waste of money. The product inside the display matters at least as much as the display itself. Below is a selection matrix that maps product categories to store types, pricing sweet spots, and the display format most likely to convert.
| Product Category | Best For (Store Type) | Price Sweet Spot | Impulse Buy Rate | Recommended Display Format |
|---|---|---|---|---|
| Gum, Mints, Candy | Convenience stores, gas stations | $0.50–3 | ★★★★★ | Tiered stand + clear bin |
| Travel-Size Toiletries | Pharmacies, supermarkets | $1–8 | ★★★★ | Clear bin with price-tier label |
| Phone Chargers & Earbuds | Electronics, convenience | $5–25 | ★★★ | Hanging hooks with security tether |
| Gift Cards | All retail types | $10–100 | ★★★★ | Countertop spinner rack |
| Batteries | Convenience, electronics, hardware | $3–15 | ★★★★★ | Small bin placed beside card reader |
| Seasonal Items | All retail types | $2–20 | ★★★★ | Rotating mini-display with themed signage |
| Lip Balms & Small Cosmetics | Pharmacies, beauty, fashion | $2–8 | ★★★★ | Tiered stand middle shelf |
| Reusable Bags | Grocery, eco-focused retail | $1–5 | ★★★ | Hanging hook or bin near register exit |
Three iron rules govern counter product selection, and they have remained stable across decades of retail testing. First, the price ceiling for impulse purchases sits at roughly twenty dollars. Above that threshold, the customer shifts from impulse mode to deliberation mode — they start calculating, comparing, and deferring. Second, every counter product must be self-explanatory. If a customer needs to read a description or ask a question to understand what the item does, it does not belong at the counter. Third, every counter product must be grabbable with one hand. The checkout zone is not a browsing zone — it is a reach-and-go zone.

In terms of total SKU count, aim for a sweet spot of 15 to 25 distinct products across your entire counter area. Fewer than 15 wastes the available attention inventory; more than 25 triggers decision fatigue, and the customer stops engaging with the display altogether. Curate ruthlessly. If a product has not sold in the past four weeks from its counter position, rotate it out and test a replacement. The counter is not a museum — it is the highest-velocity sales floor in your store.
04 Seasonal Rotation — How to Keep Your Counter Display Fresh Year-Round
Even the best counter display has an expiration date — not on the products, but on the customer’s attention. After roughly three weeks of seeing the same arrangement, regular shoppers stop noticing it. The display becomes visual wallpaper, and the impulse attachment rate drops by an estimated 40 percent from its initial peak. Rotation is not a nice-to-have. It is the maintenance cost of keeping the counter profitable.
Plan your rotation on a quarterly cadence, aligned to events that your customers already care about. The first quarter carries New Year organization themes and Valentine’s Day gifting. The second quarter shifts to spring refresh, graduation season, and outdoor accessories. The third quarter captures back-to-school and late-summer clearance. The fourth quarter is the high season — Halloween, Thanksgiving, and the extended Christmas shopping window all demand distinct counter treatments.
The operational rule is simple: products go up ten to fourteen days before the relevant event or season begins, and come down no more than three days after it ends. Late-season clearance on November 3rd, when Halloween displays are still sitting at the counter, signals to the customer that your store is behind the curve. They may not consciously register it, but it chips away at the perception of a well-run operation.
A practical efficiency tip: design a single twelve-month rotation calendar at the start of the year and batch-purchase your seasonal display materials — signage, themed containers, and accent props — in a single order. The per-unit cost drops significantly, and you eliminate the last-minute scramble that leads to half-finished seasonal displays.
05 The Digital Upgrade — Smart Displays That Transform Retail Counters
Here is where this article departs from every other “retail counter display ideas” guide on the search results page. The conventional wisdom treats digital technology as a footnote — “add a tablet or a screen” — and moves on. But the digitization of the retail counter is not a footnote. It is the most consequential shift in point-of-sale strategy since the barcode scanner.
Traditional counter displays solve one question: what to put in front of the customer. Digital displays solve three: what to show, when to change it, and how to verify it worked. These two layers are not competitors. The digital layer sits on top of the physical layer — it adds real-time intelligence to the same shelving, bins, and hooks you already use.
Before diving into the specific technologies, a practical scale helps orient the decision. The four options below are arranged from lightest to heaviest deployment — pick the entry point that matches your store’s size, budget, and technical readiness, and expand from there.
Electronic Shelf Labels (ESL) — Real-Time Pricing at the Counter
The smallest viable unit of counter digitization is the electronic shelf label. ESLs replace paper price tags with e-paper displays — the same bi-stable screen technology used in e-readers. The display holds an image indefinitely without consuming power. It refreshes in under a second when updated. And it remains perfectly readable under bright retail lighting.

The immediate operational benefit is obvious: price changes that used to require a staff member walking the floor with a label gun now happen from a central dashboard, across all counters and all stores, in seconds. But the strategic benefit runs deeper. When your counter prices are digital, you can run time-based promotions — a happy-hour discount on counter snacks from 3 PM to 5 PM, or a weekend-only bundle — without any physical labor. You can ensure that the price on the shelf edge matches exactly what the POS charges at the register, eliminating a source of customer friction that generates complaints and erodes trust.
The ESL market reached an estimated two to three billion dollars in 2025, growing at an annual rate between 12 and 17 percent (GII Research, 2026). This growth is not driven by hype. Retailers run the numbers on labor savings and pricing accuracy, and the math works: for a mid-size supermarket with 8,000 to 15,000 labels, ESL deployment typically pays for itself within 12 to 18 months.
When evaluating ESL systems, pay attention to the wireless protocol. A 2.4 GHz system offers high-speed concurrent updates across thousands of labels and works well in dense retail environments. BLE (Bluetooth Low Energy) is simpler to deploy but has lower throughput — better suited for smaller stores. NFC adds a consumer-facing interactive dimension: the customer taps the label with their phone to pull up product details, reviews, or a promotional offer. The right protocol depends on your store’s size, label count, and whether you want the labels to double as a customer engagement channel.
LCD Shelf-Edge Displays — Bringing Color and Motion to the Counter
If ESL is the functional layer, LCD is the experiential layer. A full-color LCD display mounted at the shelf edge or counter can show product photography, animated promotional messages, ingredient or allergen information, and QR codes — all updated remotely and in real time.
The product form factor matters. A stretch-bar LCD — long and narrow — fits naturally along a counter’s front edge or shelf lip. A square or round LCD works as a standalone promotional hotspot beside a featured product. For larger counters or end-cap displays, a digital signage panel in the 10-to-15-inch range can anchor an entire promotional zone. What all these formats share is the ability to change content without printing, shipping, or manual labor — the same operational leap that ESLs provide, but with the added horsepower of color and motion.
Commercial-grade LCD panels designed for retail environments carry a rated lifespan of 50,000 hours — roughly five to six years of continuous 24/7 operation. They use OEM panels from display manufacturers like BOE, LG, and Samsung, and are built for the heat, dust, and ambient light of a working retail floor rather than a climate-controlled office. Resolution should be 2K (1920 by 1080 pixels) at minimum for counter-distance viewing; anything lower and the pixels become visible at arm’s length.
One deployment detail that is easy to overlook: screen brightness must be calibrated to the store’s ambient light. A screen that is too bright reads as an advertising billboard and triggers the customer’s ad-blindness reflex. A screen that is too dim disappears into the background. The sweet spot is roughly two to three times the ambient brightness of the counter area — visible but not aggressive.
QR Codes and NFC Tags — Making Static Displays Interactive
Not every digital upgrade requires a screen. QR codes and NFC tags can be added to existing physical displays for near-zero cost, turning any static product presentation into a two-way interaction. A printed QR code on a shelf talker, sized at a minimum of two by two centimeters for reliable phone-camera recognition, can link to a product demonstration video, a customer review page, or a limited-time offer. An NFC tag — costing ten to fifty cents per unit in bulk — lets a customer tap their phone against a display card and instantly receive product details, add an item to a wishlist, or sign up for a loyalty program.
The counter is an unusually good location for QR and NFC engagement because the customer is standing still with time to spare. QR scan rates at the checkout counter run between three and eight percent, significantly higher than in-aisle QR placements, where the customer is moving and less likely to stop and scan (Shopify Retail Research, 2026). But there is a hard rule: a naked QR code — a black-and-white square with no accompanying text — will be ignored. Every QR code needs a one-line call to action beside it: “Scan to see how this works” or “Tap for today’s deal.” Without that prompt, the customer sees decoration, not an invitation.
Integrated POS-Display Ecosystems — When Everything Talks to Everything
The individual technologies above become exponentially more powerful when they operate as a unified system. In a fully integrated setup, the ESL management platform communicates with the POS database, which communicates with inventory, which communicates with the LCD promotional displays — all through lightweight, open-standard protocols.
The operational scenarios this unlocks are worth enumerating. When inventory for a given SKU drops to zero, the POS flags it, and within seconds the corresponding ESL updates to show “Temporarily Out of Stock” — no staff intervention required. When a promotional window opens at 9 AM, every relevant counter display — ESL prices, LCD promotional screens, and QR-linked landing pages — switches to the promotional content simultaneously across all store locations. When a regional manager wants to test whether a new counter layout improves attachment rate, they can push the change to a subset of stores, collect two weeks of transactional data, and compare — all without dispatching a single field visit.
This is not a futuristic concept. It is the architecture that powers the retail chains currently digitizing at scale — and it depends on one critical architectural choice: open protocols. A system built on MQTT, the lightweight messaging protocol designed for IoT devices, can integrate with any POS, ERP, or CRM that exposes a REST API. A system built on proprietary, closed protocols locks the retailer into a single vendor’s ecosystem and makes future expansion painful. When evaluating integrated display solutions, ask not just what the system does today, but whether its communication layer is open and documented. An open API and SDK mean your in-house IT team or third-party integrator can connect the display system to whatever software stack you already run — rather than rebuilding around the display vendor’s walled garden. This distinction between open and closed architecture is often the difference between a system that scales with your business and one that becomes a bottleneck.
Reflecting these priorities, a modern smart store approach relies on multi-protocol hardware. Selecting devices that support 2.4 GHz, BLE, and NFC concurrently gives you the flexibility to deploy high-density updates on the main floor while retaining proximity-based consumer engagement at the checkout counter. zhsunyco® offers this type of integrated ESL-plus-LCD ecosystem, backed by open API and SDK documentation, making it a viable baseline if you are evaluating scalable vendor setups (multi-protocol ESL systems, system integration support).
06 Your 30-Day Counter Display Transformation Plan
The ideas in this article span a wide range — from a ten-dollar clear bin to a full integrated digital display system. What follows is a phased, four-week plan that turns these concepts into action, ordered so that each week builds on the previous one without requiring a large upfront investment.
Week 1 — Audit and Clear
Remove every item currently on and around your checkout counter. All of it. Measure the available surface area, the back-wall height, and any side panels that could support hooks or pegboard. Then pull three months of sales data for every SKU that was sitting at the counter. Rank them by units sold. The bottom 20 percent — the products that barely moved despite prime placement — get permanently reassigned to the sales floor or discontinued. Counter real estate is too valuable to carry dead weight.
Week 2 — Build the Foundation
Select 15 to 25 counter SKUs using the product selection matrix from the earlier section. Order or repurpose three to four basic display fixtures: at least one tiered stand, one set of clear bins with labels, and one set of hanging hooks for the back wall or counter side. Arrange the products using the format guidelines from the traditional displays section — middle-shelf placement for high-margin items, single-price-tier bins with bold labels, and logical cross-merchandising pairings where they fit naturally.
Week 3 — Add the Intelligence Layer
Assess your digital entry point. If your counter has fewer than 50 price points, start with a small BLE-based ESL pilot covering only the counter zone — this keeps the cost and complexity manageable while letting you experience the workflow of digital price management. If your budget and scale support it, add a single LCD shelf-edge display beside your highest-margin counter product and load it with a rotating promotional message. Install basic signage — handwritten recommendation tags for your top three counter products — and record your baseline SPQ for the counter area so you have a benchmark for Week 4.
Week 4 — Test, Measure, Iterate
Launch your first A/B test. The simplest and fastest variable to test is product position on the tiered stand: swap your highest-margin item from the top shelf to the middle shelf and track the impact over two full weeks. At the same time, plan your next quarter’s seasonal rotation — pull the calendar, identify the first seasonal switch date, and batch-order any themed display materials you need. By the end of Week 4, you will have a clean, measurable counter display strategy, a baseline performance number, and a repeatable process for continuous improvement.
Ongoing
Rotate at least one display zone every two to three weeks. Review the counter SPQ monthly and compare it against your pre-optimization baseline. Revisit your digital upgrade road map quarterly — what started as a small ESL pilot can expand to additional counters, then to shelf edges across the store, then to integrated LCD promotional screens, each phase building on the infrastructure and operational experience of the previous one.
For store operators evaluating their next step, a practical starting point is to compare specifications across digital display vendors — Zhsunyco®, for example, serves over 41,500 stores across 180 countries with integrated ESL and LCD counter display systems, and its product catalog is available online for a side-by-side comparison with your current setup (explore digital counter display solutions).
References
- Invesp. “Impulse Buying Statistics.” 2025. https://www.invesp.com/blog/impulse-buying/
- POP Display. “Counter Displays That Win at Checkout.” 2024. https://popdisplay.me/counter-displays-that-win-at-checkout/
- GII Research. “Electronic Shelf Label Market Opportunity, Growth Drivers, Industry Trend Analysis and Forecast 2026-2035.” 2026. https://www.giiresearch.com/report/gmi1936597-electronic-shelf-label-market-opportunity-growth.html
- Shopify. “Build a Better Cash Wrap Counter for More Sales.” 2026. https://www.shopify.com/enterprise/blog/cash-wrap
- Zhsunyco. “Electronic Shelf Labels.” https://www.zhsunyco.com/esl/
- Zhsunyco. “Customization.” https://www.zhsunyco.com/customization/
- Zhsunyco. “Contact Us.” https://www.zhsunyco.com/contact-us/
- Zhsunyco. “Homepage.” https://www.zhsunyco.com/
